Task Spooler
Duc Nguyen
Introduction
Task Spooler was originally developed by Lluis Batlle i Rossell but is no longer maintained. The branch introduced here is a fork of the original program with more features including GPU support.
Basics of Task Spooler
First look

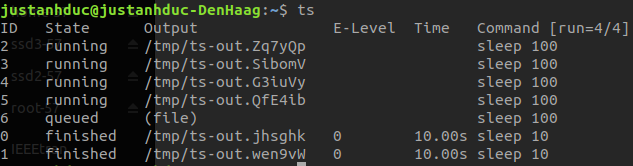
The interface of Task Spooler is shown above by simply executing ts without argument.
In the figure above, ID refers to job ID.
There are four main types of State: running indicates that a job is currently running,
queued that a CPU job is waiting to be executed, allocating is a queued GPU job,
and running means the job is currently being executed.
When a job is executed, the stdout stream is redirected to a file under the Output tab.
These log files will never automatically deleted even after the job list is cleared.
E-Level captures and displays the return error of a process.
Time indicates the running time of a job.
The running command is shown in the Command column.
The numbers inside the square bracket next to Command specify the number of currently running
jobs and the maximum jobs (slots) that can be run in parallel.
For example, in the figure above, there is no running job and you can run at most one job in
parallel, respectively.
The maximum slot number can be adjusted manually.
Queuing jobs
Jobs can be added by simply appending ts in front of your command.
For e.g., to run make the system sleep for 10 seconds using Task Spooler, execute
ts sleep 10
Let’s add one more job by executing ts sleep 10 again.
Next, let’s see the job status by typing ts.
You should see an interface similar as follows

You can see that the first job with ID 0 is currently running, and
the other job is being queued.
After 10 seconds, the first job will finish with an E-Level of 0 and
the second job will start.
To enable running more jobs in parallel, you can increase the maximum slot number by
using a -S flag followed by the desired number.
For instance,
ts -S 4
allows you to run 4 jobs at the same time.
You can verify by typing ts and the last number in the square bracket should change
to 4.
Let’s try queuing 5 jobs at once and this time we should increase the sleep time to
100 so that the job doesn’t end too fast.
You should be able to see something like this
Viewing command outputs
As mentioned above, the stdout of the command is redirected to a file specified in the
Output column.
To manually see the written output, you can simply look for that file.
But of course Task Spooler is more than that. It lets you read the outputs contents in two ways
via the flags -t and -c.
-c, which stands for cat, allows you to see all the output from the beginning to the end.
-t, which means tail, displays only the last 10 lines of the output.
Let’s try them out.
First, we can something that can produce a lot of texts, like ls, df or du.
The choice is yours.
For me, I ran ts ls /usr/bin. The job ID of the command in my case is 9 so to visualize
the whole output, I used ts -c 9. It displayed a long list of excutable files.
When I typed ts -t 9, it showed only the last 10 lines like this
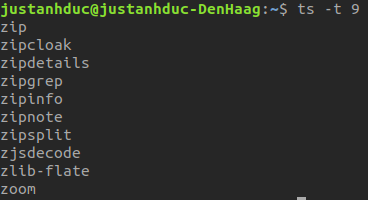
I guess most of you will have the same last line as mine.
Miscs
There are many other flag options to manage your tasks.
First of all, to see all the available options, use a -h options.
Among these, the ones you probably will use most are -r, -C, -k, -T and -K.
To remove a queued or finished job (with finished, queued or allocating status),
use -r with optionally a job ID.
For example, ts -r removes the last added job if it is not running yet.
ts -r 10 removes the job with ID 10.
If the job is successfully removed, it should disappear from the job list.
To clear all the finished jobs from the list, use -C without argument.
To kill a running job, use ts -k <jobid>.
To kill all running jobs, use ts -T.
Finally, ts -K will kill the Task Spooler process.
There are some useful flags when scheduling tasks as well.
You may want to execute a task only after a certain job finishes.
In this case you can use the flag -d with no argument to make your future task depend on
the last added job, and -D with a job ID which is
the ID of the job that the to-be-run task depends on.
For example, we can first tell the PC to sleep for 100 seconds,
and then use ts -d sleep 100 to continue to sleep after waking up from the first sleep,
and ts -D <ID-of-the-first-sleep> to spawn one more sleep after the first one.
You should be able to see something like following

As can be seen, the first sleep in my case has ID 13, and the subsequent sleeps depend
on it as indicated in the square bracket before the sleep command.
Also, the last two sleep are not carried out right away even though there are still
3 slots left.
To distinguish tasks, you can also label them using the -L flag.
Let’s try
ts -L foo sleep 1
and you should see the label foo in front of the sleep 1 command.
GPU support
The interface above comes from the CPU-only version of Task Spooler that is faithful to the original. If you install a GPU-supported version, you should see the following interface

The GPUs column shows the number of GPUs that the task requires.
Before, when running CPU tasks, the number of parallel tasks is capped by the number of slots. For a GPU task, it is further restricted by the number of available GPUs. In other words, a GPU task can run only when there are enough both slots and GPUs. The availability of a GPU is determined by the free memory of that GPU. If more than 90% of the memory is available, the GPU is deemed to be free, and vice versa. If there are more free GPUs than required, the GPUs will be chosen auto-magically and randomly.
There is one thing to note here. Because the availability of a GPU is determined by its
memory usage, and it may take time for your task to initialize the GPU memory, so if you
run two tasks at the same time, they may use the same device and eventually may crash due to
out-of-memory error.
Therefore, in Task Spooler, I deliberately delay subsequent GPU tasks a short time
(30 seconds by default) after a GPU task is just executed.
This is ugly, but it does the job.
You can change this delay time via the flag --set_gpu_wait followed by the number of seconds.
That’s why when you execute several jobs at once, you may find the tasks after the first one
taking a long time to start execution.
Also sometimes you may see the job status being changed to running but the task is not actually
executed yet, and there is no output file. This is usual. Just keep waiting… It will be
executed soon (or sometimes not very soon, but anw it will run)!
Now, to tell Task Spooler that your job requires GPU, use -G followed by the number of
required GPUs. Task Spooler will allocate the GPU(s) for the job, and it will make your job see
only the provided GPU(s) so your task won’t mess with the others.
For a stupid example, let’s sleep with 1 GPU. In your terminal, execute
ts -G 1 sleep 1
You will see

if you are not fast enough to type the ts command within 1 second.
If you demand more GPUs than available, however, it will queue the task even though there are
enough slots.

In the figure, I demanded 100 GPUs even though the server has only 8, and hence the task has to be queued (in this case, forever).
Let’s run 5 sleep tasks this time, each of which requires 1 GPU. You should be able to see that the first task is currently running, and the other tasks are still being queued due to the delay mentioned above.
We haven’t done anything useful yet. In the next section, let’s see how to manage your deep learning experiments using Task Spooler.
Deep learning with Task Spooler
Let’s train a Convolutional Neural Network (CNN) on MNIST. For this example, I will use the official Pytorch MNIST example. To enable the code to use muti-GPU, you will have to manually add
model = nn.DataParallel(model)
after line 124 (optimizer = optim.Adadelta(model.parameters(), lr=args.lr)).
You may want to scale the batch size by torch.cuda.device_count() as well.
To train the CNN with Task Spooler using 1 GPU, execute the script as usual in terminal
but with ts -G 1 before python. The full command is
ts -G 1 python mnist.py
Your task should run immediately. To see the output, use the -c or -t flag.
You should see the training in real-time as follows
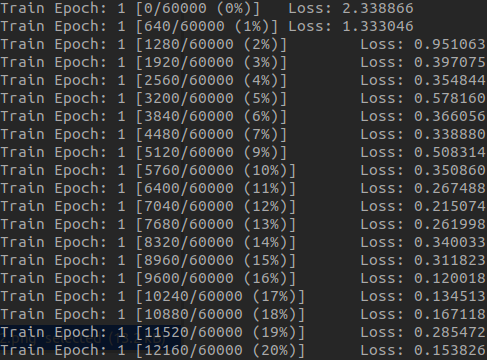
To stop getting the texts, simple use ctrl+c.
Next I will try to run with 4 GPUs and with a batch size of 256. The command is
ts -G 4 python mnist.py --batch-size 256
The task should now use 4 GPUs. You can go ahead and queue more tasks. For example, this is my queue

Job 4 is running and using 4 GPUs.
Job 5 requires 4 GPUs to run, which my server didn’t have enough at that time, and
so it is being queued.
Job 6 has to wait for job 4, so it is queued as well.
That’s it folks. I hope this little app can boost your productivity and you will enjoy using it for not only your experiments but also your daily tasks. If you have any questions or want to contribute, feel free to create an issue or make a PR on the Github page.